
TU/e Impact-Aware Robotics Database
Contributing
If you have a dataset that could be a valuable contribution to the Impact-Aware Robotics Database, you can convert your dataset to comply with our database structure. On this page, we will guide you through that process. All the files and tools needed in this process can be found on our Gitlab page . For further questions, please contact us via the contact information shown on the Contact Page .
Overview
1. Converting your dataset 1.1 Structuring your raw data 1.2 Adding Objects, Robots, and Environments to the database 1.2.1 Adding Objects 1.2.2 Adding Robot Manipulators 1.2.3 Adding Robot Components 1.2.3 Adding Environments 1.3 Adding Setups and Sensors 1.3.1 Adding Sensor assets 1.4 Impact-Aware Taxonomy for data classification 1.4.1 First example of using the Taxonomy 1.4.2 Second example of using the Taxonomy 1.4.3 Third example of using the Taxonomy 2 Uploading your dataset to the database 3. Creating a dataset using our data-collection tools1. Converting your dataset to an Impact-Aware Robotics dataset
If you have collected data that you believe is relevant for the Impact-Aware Robotics Database,
you can convert your data into a dataset that complies with our required dataset structure.
All datasets within the Impact-Aware Robotics database are single files in HDF5 format. This
format is chosen, as it is a versatile data model that can represent complex, heterogeneous
data objects and a wide variety of metadata through an unlimited variety of data types, it is
self-describing, and it is an architecturally independent software library that runs on a
wide range of computational platforms and programming languages. Furthermore, it is designed
to store and organize large amounts of data, and is known as a standard in industry used by,
amongst others, NASA. Each dataset is constituted by several recorded experiments, focusing
on a specific type of release/impact motion and scenario, involving known objects, robots,
and environments. It can contain, especially, time series data related to objects impacting
the environment, objects impacting robots, objects impacting the environment while being
held by robots, objects impacted by robots while being in contact with the environment, and
corresponding release motions related to objects detaching from the environment, objects
separating from a robot (in particular, its end effector), objects separating from the
environment while being held by robots, objects separating from a robot while being in
contact with the environment.
In the following sections, we will further detail the structure of the dataset, the taxonomy used for data classification,
and the tools we provide for converting a dataset into a HDF5 file that can be uploaded to the database.
1.1 Structuring your raw data files
Each dataset (HDF5 file) is organized in a hierarchical structure (folder/file type structure), containing both sensor measurement data and metadata (attributes, both at folder and file level). The proposed structure for each dataset is straightforward, containing a root folder and several subfolders, each corresponding to a specific recording. The figure below shows this dataset content structure. Under each recording, the object, robot, and environment folder contain metadata that allows for both human and machine interpretability and search. Examples are the properties of the object (mass, inertia, dimensions), the exact robot configuration and description (URDF with STL files), and properties of the environment (e.g, surface material and speed of a conveyor belt). Furthermore, each recording contains generic metadata about the experiment, such as date, location, and time of the experiment.

If you have a dataset, it is important to first organize your data to comply with this structure. To this end, your data should be structured on your system according to the following structure:
                                + PATH
                                |   - MetaDataRoot.yml
                                |   + Session_jjjj-mm-dd
                                |   |   + Rec_jjjjmmddThhmmssZ
                                |   |   + Rec_jjjjmmddThhmmssZ
                                |   |   |   - MetaDataRec.yml
                                |   |   |   - Robot_data_jjjjmmddThhmmssZ.csv
                                |   |   |   - RS_video_jjjjmmddThhmmssZ.mp4
                                |   |   |   - ...
                                |   |   + Rec_jjjjmmddThhmmssZ
                                |   |   + ...
                                |   + Session_jjjj-mm-dd
                                |   + ...
This means that each from the main dataset path, you can have multiple Session folders, each containing multiple Recording folders. It is important that the names of these folders are complying with the names as indicated above (e.g., the recording folders have the creation timestamp in the name), to make sure the conversion later is done properly. Furthermore, each Recording folder contains all the raw data files that were collected during that specific experiment. This ensures that data is not mixed up in the process (e.g., in a case where you have one folder with 20 videos and one folder with 20 csv files, you can easily mix up which video recording corresponds to which csv file.) Inside these recording folders, you can have all kinds of data. This data will later be post-processed and converted to the HDF5 format.
At the root of the dataset PATH and in each Recording folder, there is a MetaData yaml file. The root metadata file, for which an example is given below, provides general information about the dataset, including all objects, robots, and environments used in this dataset, and all metadata tags related to the Taxonomy (as part of the transition metadata tag, which we will go over later). The attributes note and description can be chosen arbitrarily, and have the purpose of describing the data. It is important to state, that the names under robot, object, and environment, should coincide with those listed on the robot, object, and the environment page. The items shown on these pages, correspond to the information stored in the ROBOT, OBJECT, and ENVIRONMENT folders of the Gitlab page . If you use robots, objects, or environments that do not exist yet, you can add those to the database, which we will discuss at a later stage. For the robot metadata, it is important that all components added to the robot are also listed following the order of the kinematic chain. In the example below, it means the FrankaEmikaRobot is used, and attached there are the SENS_ForceTorque001 sensor, and then the TOOL_Pusher001.
                                #General metadata of this dataset
                                attr:
                                  note: "Recordings for friction estimation"
                                  description: "Pushing box at constant speed to estimate friction coefficient, related for I.AM. BOX scenario."
                                  keywords: "robotics; nonsmooth mechanics; robot; impact; collision; carton box; data collection"
                                  project: "H2020 EU I.AM. project, Grant Agreement No. 871899"
                                  purpose: "modeling"
                                  transition: "impact; object; environment"
                                  robot: "FrankaEmikaRobot; SENS_ForceTorque001; TOOL_Pusher001"
                                  object: "Box007"
                                  environment: ""
                                  sensor: "motion capture; joint encoder; camera; pressure sensor; Force-Torque"
                                  author: "Author1 name, Author2 name"
                                  institution: "Eindhoven University of Technology (TU/e)"
Each recording folder contains a MetaDataRec.yml yaml file that contains the metadata about that specific recording. The full file can be found here, but we will split it up here in several parts to go through the file. The first part contains general metadata:
                                attr:
                                  author: "Author1 Name, Author 2 Name"
                                  institution: "Eindhoven University of Technology (TU/e)"
                                  note: "Recording for friction estimation"
                                  object_environment: "point; single; bounce"
                                  robot_environment: " "
                                  robot_object: " "
                                  transition: "impact; object; environment"
                                  setup: TUE_VanderlandeInnovation
Note that in the metadata shown above, the fields object_environment, robot_environment, and robot_object refer to the contact interaction between object, robot, and environment. These fields are related to the taxonomy, used to classify certain type of impact experiments, and we will go over this in detail in the Taxonomy section. The field setup refers to the setup that is being used in this recording, which is specified under:
/data-storage/writeH5/setupinfo/SETUP/
The second part contains information about the objects, environments, and robots that are used in the recording. Similar to the metadata root file, it is important that the names correspond to those existing in the database. The robot configuration is build up according to the kinematic chain. That means that we specify the main robot and then all the components attached to it. In the example below, the FrankaEmikaRobot is used, and attached there are two components. First the SENS_ForceTorque001 sensor, and then the TOOL_Pusher001. The order of the configuration is important, as it will be used to dynamically create an URDF file of the robot configuration.
                                #Select what objects are tracked
                                object:
                                  obj_1:
                                    name: "Box007"

                                #Select what environment is used
                                environment:
                                  env_1:
                                    name: ""

                                #Robot configuration
                                robot:
                                  rob_1:
                                    name: "FrankaEmikaRobot"
                                    component_1:
                                      name: "SENS_ForceTorque001"
                                    component_2:
                                      name: "TOOL_Pusher001"

                                #Select the sensors used in this recording
                                UR10: false
                                Panda: true
                                ref_camera: true
                                mc_rtc: true
                                ft_sensor: true

                                #Camera settings
                                exposure: 87
                                gain: 63
                                contrast: 53
                                brightness: 0
                                saturation: 64
                                width: 1920
                                height: 1080
                                freq: 30

                                #Specify the runtime of the recording in seconds:
                                runtime: 15 #Not used when mc_rtc = true
At this point, we have discussed a scenario where you have raw data, structured in the correct folder/subfolder structure, containing experiments and metadata of objects, robots, and environments that are part of the database. In case you used objects, robots, and environments that are not part of the database yet, you will have to add them. We will cover this in the next section.
1.2 Adding Robots, Objects, and Environments to the database
We distinguish all items that can be part of a scene as either an object, a robot (manipulator), a robot (component), or an environment. In case you are using one of these items in an experiment and this item is not part of the database, you will have to add it. In the subsections below, we will discuss for each category how you can do this.
1.2.1 Adding Objects
On our gitlab page, there is a specific subfolder that contains all the metadata for all Objects which can be found here. It is important to always use the suffix numbering the object, such as "Box001", and use as a name the sequential number based on what exists in the database. This is because for each object, multiple may exists (e.g., we can multiple items named "Box"). This suffix allows us to have 999 items of the same name. Also for new objects, this naming convention should be used. When adding new objects, you will have to create a folder under the OBJECT folder with the name matching the object name. In this subfolder, you will have to add at least a picture with .jpg extension and a MetaData.yml file, and optionally other files such as STL files. All these files, except for the MetaData.yml file, need to have the name corresponding to the object. Below, we provide an example that illustrates how this can be done.
Example
As an example, we will add a carton box that is used in experiments to the OBJECT folder. Let us assume this is the first object called "Box", such that we name this object Box001. This means, we will first have to create a subfolder with the name "Box001", such that we obtain:
/data-storage/writeH5/setupinfo/OBJECT/Box001/
We now have to provide at least a picture with .jpg extension and a MetaData.yml file. In our case, we will also add a STL file of the box. We now have a folder structure that looks like this:
                                + Box001
                                |   - Box001.jpg
                                |   - Box001.stl
                                |   - MetaData.yml
The Box001.jpg file is a simple picture of the object, that shows the object as used in experiments.
In our case, the picture of Box001 is given as
 In this picture, you can also see the Motion capture markers, whose information will be discussed in
1.3.1 Adding Sensor assets
The MetaData.yml file contains all relevant metadata of the object, which may differ per object. In our case, we add the information as
displayed below:
In this picture, you can also see the Motion capture markers, whose information will be discussed in
1.3.1 Adding Sensor assets
The MetaData.yml file contains all relevant metadata of the object, which may differ per object. In our case, we add the information as
displayed below:
                                #General object information
                                attr:
                                  class: "OBJECT"
                                  type:"uniformly filled carton box"
                                  model:"TUe_box_model_1"
                                  note:"carton box filled with Sculpture Block foam"
                                  name: "Box001"
                                  innerMaterial:"Sculpture Block SB30. Density of 100 kg/m3. Manually cut to fit size of the box."
                                  outerMaterial:"Carton"

                                dimensions:
                                  ds: [0.117, 0.091, 0.066]
                                  attr:
                                    note: "Dimensions of Box001"

                                mass:
                                  ds:0.088
                                  attr:
                                    note:"Mass of Box001"

                                #Vertices of the box
                                vertices:
                                  attr:
                                    note:"Vertices of Box001"
                                  ds:
                                    -[0.0585 -0.0455 -0.033]
                                    -[-0.0585 -0.0455 -0.033]
                                    -[-0.0585 0.0455 -0.033]
                                    -[0.0585 0.0455 -0.033]
                                    -[0.0585 -0.0455 0.033]
                                    -[-0.0585 -0.0455 0.033]
                                    -[-0.0585 0.0455 0.033]
                                    -[0.0585 0.0455 0.033]

                                #Inertia tensor of the box
                                inertia:
                                  attr:
                                    note:"Inertia tensor of Box001"
                                  ds:
                                    -[0.088	0.0	0.0	0.0	0.0	0.0]
                                    -[0.0	0.088	0.0	0.0	0.0	0.0]
                                    -[0.0	0.0	0.088	0.0	0.0	0.0]
                                    -[0.0	0.0	0.0	1.04E-4	0.0	0.0]
                                    -[0.0	0.0	0.0	0.0	1.54E-4	0.0]
                                    -[0.0	0.0	0.0	0.0	0.0	1.82E-4]
As shown in the file above, certain general metadata are stored under the attr (attributes) tag. All other metadata, in this case the dimensions, mass, vertices, and inertia matrix of the box, come with heir own attributes describing the type of data. Note that the metadata tags under attr are required, while all other metadata are optional and automatically added to the dataset, which means that any other metadata can also be added here in a similar fashion.
1.2.2 Adding Robot Manipulators
We consider a difference between robot manipulators and robot components, as components can be added to robots in different forms. The robot manipulators are stored in the folder
/data-storage/writeH5/setupinfo/ROBOT/Manipulator/
This folder contains subfolders for each manipulator that is part of the database. If you want to add a new robot manipulator, you will have to create a folder which has as folder name the name of the manipulator. As an example, we will add the UR10 manipulator to the ROBOT folder. We therefore create the UR10 folder, such that we have the following structure:
                                + ROBOT
                                |   + UR10
                                |   |   - MetaData.yml
                                |   |   - UR10.jpg
                                |   |   + Description
                                |   |   |   - UR10_configuration.png
                                |   |   |   - joint_link_name_convention.txt
                                |   |   |   - robot.urdf
                                |   |   |   - empty_link.urdf
                                |   |   |   - link01.stl
                                |   |   |   - link02.stl
                                |   |   |   - ...
                                |   |   |   - linkNN.stl
We will go through each of the components of this folder below.
- The MetaData.yml file contains some general metadata of the robot. In this case, we have the metadata as displayed below, but this
can be adjusted as desired:
#General robot information attr: class: "ROBOT" type: "collaborative manipulator" model: "Universal Robots UR10" note: "robot manipulator from Universal Robots" - The UR10.jpg file is an image of the UR10 robot. It is required to have a .jpg image whose name corresponds to the robot name.
In this case, we have the following image:

- The Description folder is mandatory to include and contains the URDF of the robot and all STL files. Furthermore, an additional empty_link.urdf file is required. This link is used to add components to the robot URDF in a modular manner. The empty_link.urdf file can be copied from other Description folders and does not have to be adjusted. This file is used to create empty links at the end of every component, such that the next component can be attached. The robot.txt file should contain the lines of the .urdf file that describe the robot without additional components. The joint_link_name_convention.txt file describes the structure of the robot, from the first link, following all joints and links, to the last link, should contain the names of the links and joints of the robot, again without additional components. An example can be seen here. Finally, the UR10_configuration.png file is an optional file that indicates the names of the links in correspondence to the joint_link_name_convention file.
1.2.3 Adding Robot Components
The robot components are stored in the folder
/data-storage/writeH5/setupinfo/ROBOT/Component/
We distinguish between TOOL (tools), EE (end effectors), and SENS (sensors) that can be added as components to the robot. To add a new component, e.g. an end effector or sensor, one has to add a new folder within the ROBOT/Component. Suppose that EE_SuctionCup003 has not been used before, the folder structure will then look as follows after adding the new folder:
                                + ROBOT/component
                                |   + EE_FrankaHand001
                                |   + EE_MetalBall001
                                |   + EE_SoftPad001
                                |   + EE_SuctionCup001
                                |   + EE_SuctionCup002
                                |   + EE_SuctionCup003
                                |   + SENS_ForceTorque001
                                |   + TOOL_GripperA001
                                |   + TOOL_GripperB001
                                |   + TOOL_GripperB002
                                |   + TOOL_ToolChanger001
                                |   + ...
As can be seen, every component has to be classified as EE (end effector), SENS (sensor), or TOOL (tool). Within the newly created folder of EE_SuctionCup003, an .jpg, .stl, .urdf, and MetaData.yml file of the component has to be added. The .urdf file should contain the lines that describe the component. In the MetaData.yml it is important to define the transformation from the empty link at the top of the component to the empty link that will be created at the bottom of the component. For the example of EE_SuctionCup003, we thus have the folder structure
                                + ROBOT/component/EE_SuctionCup003
                                |   - EE_SuctionCup003.jpg
                                |   - EE_SuctionCup003.stl
                                |   - EE_SuctionCup003.udf
                                |   - MetaData.yml
1.2.4 Adding Environments
The procedure for adding Environments is very similar to that of adding Objects. On our gitlab page, there is a specific subfolder that contains all the metadata for all Environmentss which can be found here. In the naming convention, it is important to always use the suffix numbering the Environment, such as "Conveyor001", and use as a name the sequential number based on what exists in the database. This is because for each environment, multiple may exists (e.g., we can multiple environments named "Conveyor"). This suffix allows us to have 999 items of the same name. Also for new environments, this naming convention should be used. When adding new environments, you will have to create a folder under the ENVIRONMENT folder with the name matching the environment name. In this subfolder, you will have to add at least a picture with .jpg extension and a MetaData.yml file, and optionally other files such as STL files. All these files, except for the MetaData.yml file, need to have the name corresponding to the object. Below, we provide an example that illustrates how this can be done.
Example
As an example, we will add a conveyor that is used in experiments to the ENVIRONMENT folder. Let us assume this is the first Environment called "Conveyor", such that we name this object Conveyor001. This means, we will first have to create a subfolder with the name "Conveyor001", such that we obtain:
/data-storage/writeH5/setupinfo/ENVIRONMENT/Conveyor001/
We now have to provide at least a picture with .jpg extension and a MetaData.yml file. In our case, we will also add a STL file of the conveyor. We now have a folder structure that looks like this:
                                + Conveyor001
                                |   - Conveyor001.jpg
                                |   - Conveyor001.stl
                                |   - MetaData.yml
The Conveyor001.jpg file is a simple picture of the environment, that shows the conveyor as used in experiments.
In our case, the picture of Conveyor001 is given as
 In this picture, you can also see the Motion capture markers, whose information is part of the SENSOR information.
The MetaData.yml file contains all relevant metadata of the environment, which may differ per environment. In our case, we add the information as
displayed below:
In this picture, you can also see the Motion capture markers, whose information is part of the SENSOR information.
The MetaData.yml file contains all relevant metadata of the environment, which may differ per environment. In our case, we add the information as
displayed below:
                                #General object information
                                attr:
                                  class: "ENVIRONMENT"
                                  type:"conveyor belt"
                                  model:"custom Vanderlande small belt floor conveyor"
                                  note:"conveyor consisting of a rubber belt sliding over a smooth metal surface"
As shown in the file above, certain general metadata are stored under the attr (attributes) tag. All other metadata, which in this case is not provided, can be added below and come with heir own attributes describing the type of data. Note that the metadata tags under attr are required, while all other metadata are optional and automatically added to the dataset, which means that any other metadata can also be added here in a similar fashion.
1.3 Adding Setups and Sensors to the database
Each experimental setup can have a certain set of sensors. This means that, before specifying the sensors, it is needed to specify the setup. The information about setups and sensors is stored in the folder
/data-storage/writeH5/setupinfo/SETUP/
And this folder has the following structure:
                                + SETUP
                                |   + AB_SetupName1
                                |   + AB_SetupName2
                                |   |   - setup.png
                                |   |   - setupinfo.yml
                                |   |   + 001_SensorName1
                                |   |   + 002_SensorName2
                                |   |   |   + Assets_folder
                                |   |   |   |   - Assets_file
                                |   |   |   - Assets_file
                                |   |   |   - ...
                                |   |   + ...
                                |   |   + 00N_SensorNameN
                                |   + ...
                                |   + AB_SetupNameN
Every setup therefore has at least:
- a setup.png file
- a setupinfo.yml file
- a XXX_SensorNameN folder
Each sensor has a name and a folder whose name starts with a 3 number digit followed by an underscore and a custom name. The setup.png file is an image of the setup, preferably showing all components of the setup. Below, we show a picture of the Vanderlande Innovation Lab at the TU/e campus for reference:

The xxx_SensorNameN folder can contain additional assets that relate to that sensor, as we will discuss in the next section. The setupinfo.yml file contains all the information about the sensors that are part of the setup. For illustration purposes, we show below the metadata for a sensor called 001_RealSenseD415:
                                sensor:
                                  sensor_001:
                                    attr:
                                      name: "001_RealSenseD415"
                                      model: "Intel RealSense D415"
                                      note: "USB-powered depth camera. Consists of a pair of depth sensors, RGB sensor, and infrared projector. Only RGB data is stored"
                                      type: "Reference Camera"
                                      filename: "reference_video.mp4"
                                      file_format: "mp4"
                                    outputfile:
                                      fn_endsWith: [".bag",".mp4]
                                      fn_startsWith: ["RS_video", "RS_video"]
                                      varname: ["Reference_camera", "Reference_camera"]
                                      function: ["bag2vid", "savemp4"]
                                    datalog:
                                      attr:
                                        note: "Reference video footage of the experiment"
                                        duration_unit: "s"
                                        frame_rate_unit: "fps"
                                    radialDistortion:
                                      - [0.0567 -0.1050]
We will go through this file step by step below:
- The part under attr contains the attributes (metadata) of the sensor. This is mandatory to add.
- The part under outputfile shows what file output is expected from this sensor. In this case, any file that is found in the recording folder that starts with (fn_startsWith) RS_video and ends with (fn_endsWith) either .bag or .mp4 is expected to come from this sensor (given the fact that we know that this sensor is part of a certain indicated setup). It is possible to have different output files from the same sensor, as indicated in this example. In such a case, these different formats should be listed in arrays as indicated in the example above. During the data processing, we loop through the sensors and the raw data files and check which raw data file came from what sensor. This part is therefore important and mandatory to add. The variable varname indicates the name under which the data will be stored in the dataset. The variable function indicates the custom function that should be provided by the user that should be called when the data is processed. This function should be added in the
- filename of the raw data file
- meta_sens meta data of the sensor
- timestamp of the recording
- add_var a potentially extra variable
- The part under datalog contains extra metadata that helps interpreting the data. This is optional
- The part under radialDistortion is an in this case added variable that is stored and also optional
/data-storage/writeH5/functions/sensors/
folder, and takes as input the variables
To understand better the SETUP/SENSOR folder structure, we encourage the reader to take a look at the Gitlab page were multiple setups and sensors are already placed.
1.3.1 Adding sensor assets
Some sensors have additional assets related to them. For example, a motion capture system has a assets file that contains all information about the objects that are tracked by that system.
As an example, we take the Optitrack System related to setup TUE_VanderlandeInnovation, which is the Innovation Lab at the TU/e campus. This sensor has a list of assets related to that sensor stored in the folder:
/data-storage/writeH5/setupinfo/SETUP/TUE_VanderlandeInnovation/001_Mocap/motive_obj/
Inside this folder, each tracked object has its own folder, containing a MetaData.yml yaml file with metadata, and a frame_definition.jpg picture showing the positions of the markers and the frame in which their position is expressed.
As an example, we show the content of Box001, which has the the following two files inside:
                                + Box001
                                | - MetaData.yml
                                | - frame_definition.jpg
for which the MetaData.yml file looks like this:
                                #Marker positions of the box
                                markerPositions:
                                  attr:
                                    note: "marker coordinates with respect to body fixed frame"
                                    unit: "m"
                                  ds:
                                    - [-0.04870780184864998	0.03519909828901291	0.04149999842047691]
                                    - [0.048482801765203476	0.03526910021901131	0.04149999842047691]
                                    - [0.048525501042604446	0.01183059997856617	0.04149999842047691]
                                    - [0.04848029837012291	-0.035526398569345474	0.04149999842047691]
                                    - [-0.0482742004096508	-0.03497980162501335	0.04149999842047691]
The structure of this file is important: everything written under attr will be read as metadata and therefore stored as text, while everything under ds will be read as data, and stored according to the structure of that data (in this case a
5x3 matrix).Next to the MetaData.yml file, the Box001 folder contains a frame_definition file (shown here below), that illustrates the motion capture markers
as well as the frame in which the positions of these markers (as given in the MetaData.yml file) are expressed.

If you want to add new assets to a sensor, you should create a new folder with the name corresponding to that asset (e.g., if you defined in the Motion capture software an asset with the name TestObject, then also the name of this folder should be TestObject.).
This is important because the software that processes the data will try to look for this folder, based on the name it finds in the raw datafile. Then, make sure this folder contains a MetaData.yml and frame_definition.jpg file. After this, you should be good to go.
1.4 Impact-Aware Taxonomy for classifying datasets
The Impact-Aware Robotics Database comes with a Taxonomy. This taxonomy allows to uniquely classify different datasets by means of a limited number of metadata and corresponding possible entries. This classification is essential to be able to retrieve specific datasets out of the large database. It helps to distinguish between different datasets (e.g., just those containing recordings of impact data between an object and a surface, or those containing recordings of specific impacts between a robot and an object). In the following, the rationale and details of this taxonomy are provided, together with how such information will be stored as metadata in every dataset.
We consider three types of entities that can participate in the contact transitions: robot(s), object(s), and environments. Contact transitions are classified from simpler to more complex, based on four level, depending if the transition involves (i) just the object and the environment; (ii) just the robot and the object; (iii) just the robot and the environment, and (iv) the robot, object, and the environment. Furthermore, the dynamic contact transitions are classified either as impacts (e.g. a box hitting a table) or release (e.g. a box falling off a table). Impacts are considered to be at a higher level of complexity than releases, due to the fact that impacts cause jumps in the velocity of the object, while releases only cause jumps in the acceleration of the object. This preliminary leads to the classify dynamic transitions into a complexity level from 1 to 8, as can be seen in the figure below.

Correspondingly, each recording of dynamic contact transition in a dataset can be classified using the metadata transition, which is a list of the following entries, comprising both the type of transition and the entities involved:
- impact
- release
- object
- robot
- environment
- release; object; environment
- impact; object; environment
- release; robot; object
- impact; robot; object
- release; robot; environment
- impact; robot; environment
- release; robot; object; environment
- impact; robot; boject; environment
- object_environment
- robot_object
- robot_environment
- point
- edge
- surface
- single
- dual
- multi
- bounce: [open before & after, contact during]
- open: [contact before, open after]
- partly_open: [contact before, less contact area after]
- stay_closed: [contact before and after, same area]
- further_closed: [contact before, more contact area after]
- closed: [open before, contact after]
- shift: [contact before & after, different area]
- partly shift: [contact before & after, overlap area]
- before_motion: [relative motion, before event]
- before_rest: [no relative motion, before event]
- after_motion: [relative motion, after event]
- after_rest: [no relative motion, after event]
1.4.1. First example of using the taxonomy
As a first illustrative example, an impact corresponding to a dual-arm robot grabbing a box that was sliding, isolated, on a surface can be described with the following metadata, also displayed in in the figure below, which also illustrates the main structure of the taxonomy tree:- transition = impact; robot; object; environment
- object_environment = surface; single; open; before_motion
- robot_object = surface; dual; closed; after_rest
- robot_environment = (empty)

1.4.2. Second example of using the taxonomy
As a second illustrative example, we consider the impact motion corresponding to a box that is impacting a surface on a single corner. This could correspond to a scenario of parameter identification, where single point impacts are studied. In this case, we can describe this contact transition with the following metadata:- transition = impact; object; environment
- object_environment = point; single; bounce; before_motion
- robot_object = (empty)
- robot_environment = (empty)
1.4.3. Third example of using the taxonomy
As a third illustrative example, we consider a robot making impact with a table. This could correspond to a scenario of testing robot control strategies for robots in impact-aware manipulation. We will therefore consider a robot with a spherical end-effector, that is impacting the table therefore at a single point, after which it slides over the table, as shown in the image below.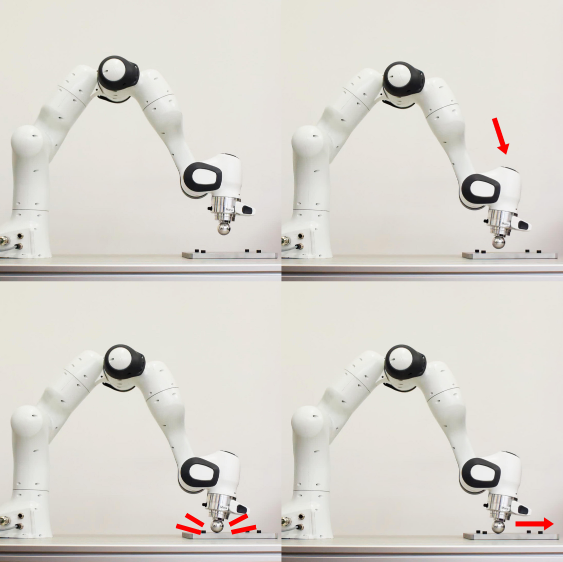 In this case, we can describe this contact transition with the following
metadata:
In this case, we can describe this contact transition with the following
metadata:
- transition = impact; robot; environment
- object_environment = (empty)
- robot_object = (empty)
- robot_environment = point; single; closed; after_motion;
2. Uploading your dataset to the database
In order to show a dataset on this website, one needs to upload the dataset to 4TU.ResearchData. 4TU.ResearchData is an international data repository for science, engineering, and design and is led by the 4TU.ResearchData Consortium, which consists of Delft University of Technology, Eindhoven University of Technology, University of Twente, and Wageningen University & Research. In this section, an explanation is given on how to upload data to 4TU.ResearchData. The concise step-by-step plan below denotes all the steps that have to be taken. Additional details about some steps can be found under the header Details.
Step-by-step plan for uploading data to 4TU.ResearchData
- Go to the 4TU.ResearchData website.
- Log in by clicking on the "LOG IN & UPLOAD DATA" header and subsequently the "Log In (Data Repository)" option from the drop-down menu (see Details).
- To upload a dataset, click the orange button that says “ADD NEW DATASET”, which can be found under the "DASHBOARD" header or the "MY DATASETS" header.
- Fill in the form to provide information to the dataset (see Details).
- To finalize, click the "SUBMIT FOR REVIEW" button.
Details
Details on logging in to 4TU.ResearchData
If your institution is affiliated with SURFconext and connected to 4TU.ResearchData, you can log in directly using your institutional credentials. If your institution is not affiliated with SURFconext, you can still log in to 4TU.ResearchData via SURFconext with an eduID. By visiting eduID you can create an eduID. Once you have created an eduID, you can log in to 4TU.ResearchData by following the steps listed under the button “Log in with eduID”, which can be found by clicking on the "LOG IN & UPLOAD DATA" header and subsequently the "About Log in / Sign up" option from the drop-down menu.
Details on providing information to the dataset
Below an example is given for a dataset that has already been uploaded to 4TU.ResearchData. Not all fields have been filled in, but the more the better.
Title
I.AM. archive containing box-drop experiments for Velocity Based Parameter Identification of Box009
Authors
Maarten Jongeneel, Sander Dingemans
Description
I.AM. archive as part of the Impact-Aware Robotics Archives Collection. This archive contains recordings of experiments that
are executed under the scenario of TOSS. In these recordings, a UR10 robot is used to toss and drop Box009 on a conveyor belt.
The purpose of these experiments is to obtain data for velocity based parameter identification as part of a modeling framework.
This modeling framework is used within the H2020 I.AM. project (www.i-am-project.eu) to predict the end pose of a certain box
on a conveyor belt, after it is tossed. This means that the involved contact is between the object and the environment, which in
these recordings are Box009 and a conveyor, respectively. All the recordings in the archive were performed at the Innovation Lab
of Vanderlande, located within the TU/e campus. More information can be found on https://impact-aware-robotics-database.tue.nl/.
License & Access
Open access with license CC BY-NC-SA 4.0
Categories
Mechanical Engineering
Group
Eindhoven University of Technology
Publisher
4TU.ResearchData
Funding
Impact Aware Manipulation by Dexterous Robot Control and Learning in Dynamic Semi-Structured Logistic Environments
References
https://impact-aware-robotics-database.tue.nl/
Language
English
Format
md, HDF5
Keywords
Robotics, Modeling, Object, Impact, Nonsmooth Mechanics, Collision, Friction, Impact-Aware Manipulation,
Collection: Impact-Aware Robotics Archives Collection
Organizations
Eindhoven University of Technology, Department of Mechanical Engineering, Dynamics and Control Group
Files
md, HDF5
3. Creating a dataset using our data-collection tools
On the Impact-Aware Robotics Database Gitlab page one can find a data collection and data storage application. These applications can be used to easily collect experimental data in the context of impact-aware robotics and store the data in a structured way. All the datasets that are shown on this website have the same structure, so future datasets must also have this structure. More information on how to create such structured datasets is explained in the README files on the Gitlab page .